
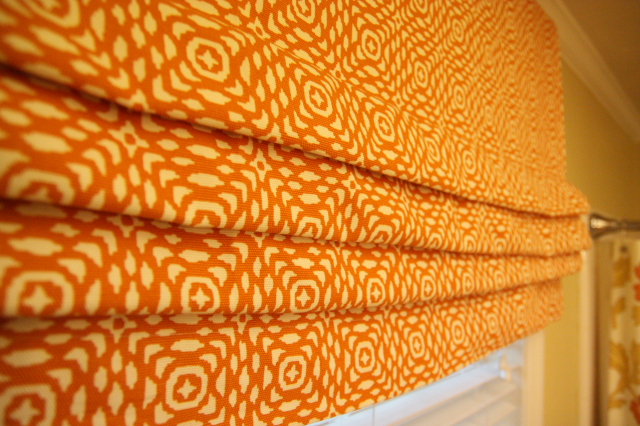
Fixed Flat-fold Roman Shade
Greetings from the land of heat, humidity, and warm pool water {which makes swimming not near as much fun}! From the blogs I read it looks like most of y'all are melting too.
We've had a wonderful week so far. The girls and I took a "field trip" to nearby Ozark, AL yesterday and visited with Paula and hit up a few other little treasure chests. We had a delightful time. The girls were eager to pick out their own fabric for a nightgown. We're going to my parent's farm next week and they absolutely need {wink} new nightgowns to take.
I thought I'd take a second and show you how I made the roman shade in the ORANGE BATHROOM. I get a lot of emails asking how I did it, but I will warn you I didn't write down my directions as I went, so this is all from memory.
Just so we're clear: it's "fixed" meaning INOPERABLE and CAN'T RAISE OR LOWER. And this is a rough "tutorial" on how I made mine. I cut corners and used glue. Some seamstresses will raise their eyebrows and question my sanity. But it's EASY and it doesn't raise or lower so glue is OK in my opinion.
Ok, here goes:
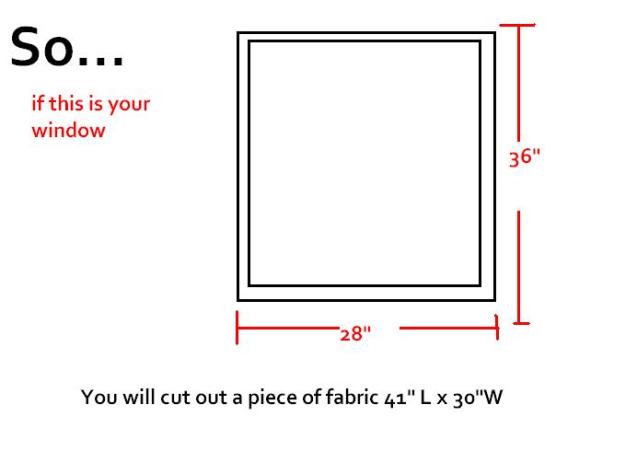
First, I measured my window from outside of trim to outside of trim and added a 1" seam allowance on both sides of the width, 1" to the top and 4" to the bottom. Which would give you this:
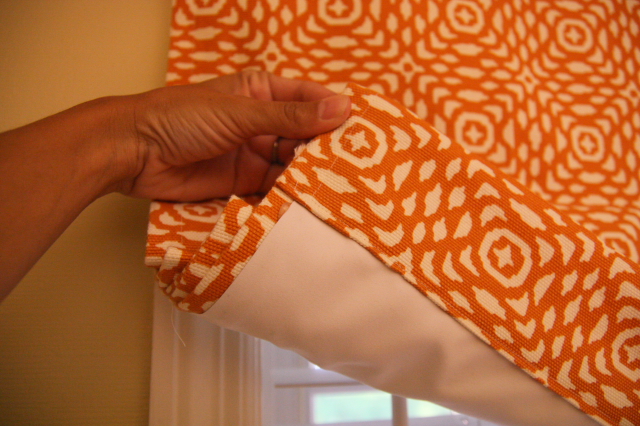
Once I cut out my fabric I turned the sides {R and L} under 1/2" and then 1/2" again and sewed a straight stitch. Then I did the same at the top. I DID NOT hem the bottom yet. I took a piece of blackout drapery lining and cut to the size of the shade less 1/2" on each side and less the hem allowance on the bottom. Then I HOT GLUED the blackout lining to my shade panel on the seams and then I hemmed the bottom by turning it under 1" and then up 3". I would only use hot glue if you use a "blackout lining". Please don't use glue if you line it with a fabric drapery lining. And please don't glue anywhere but on the edges where your seams are.
Then I added the folds.
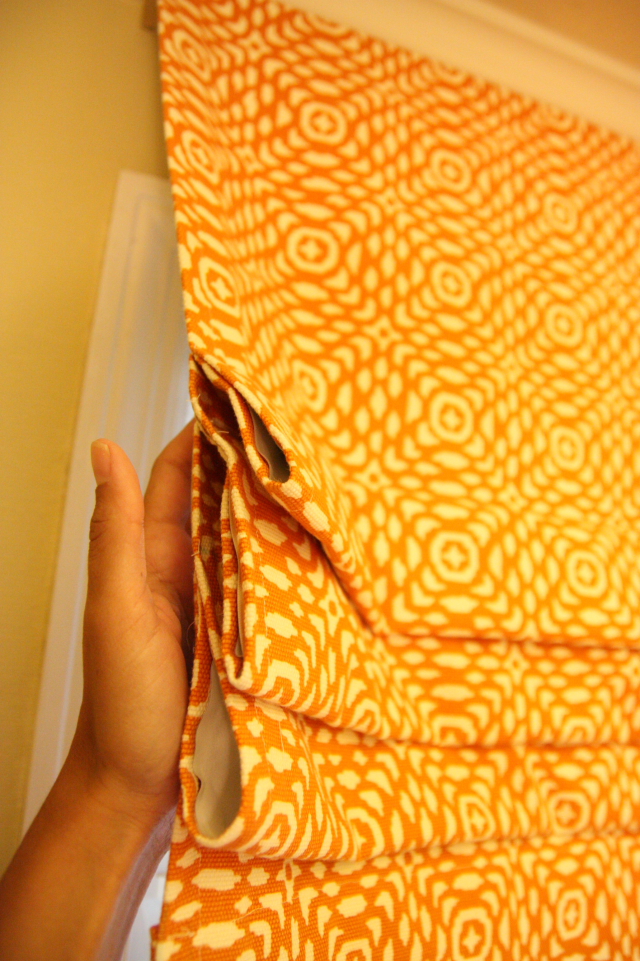
As you can see they are uneven and not equally spaced. No one will ever notice besides me and all of you. I just pinched the fabric together and worked with it until I liked how it looked. I wanted it to hang at least half way down the top window pane when mounted at the crown molding.
First exhibit: This is how far down the window I wanted it to hang.

Second exhibit: Mounted at crown molding not window trim. We have small windows and low ceilings and I wanted to add height to the window so I hung the sucker much higher so the window will appear to be much larger than it really is. You should only do this if you use blackout lining otherwise you'll be found out when the sun shines and they can see the window behind your shade.

Once my pleats were where I wanted them I sewed them together with a straight stitch. Which by the way, getting the pleats where I wanted them was the hardest part. There is probably a math formula for such thing but I just "eyeballed" it.
Then my shade was done and it was time to mount it to my 1"x 2" that my husband cut to the width of the window {outside trim to outside trim} which should be the exact measurement of your shade. I used a staple gun and stapled the shade to the board and then mounted it to the wall using dryway screws and L brackets {see exhibit 2}.
And the rest is history!
Be back soon!


48 comments:
i so need to mapquest ozark, al to see how far it is from jackson. i would love to go there.
Yaaay! Thanks so much for this tutorial. I have everything needed to make our kitchen window treatments except a clue of how to make them look. This will be perfect :)
It looks great! Your pattern lines up and in my book, that's all that counts!
Great tutorial! And I love how they turned out. I still can't get over how you made your bathroom look fun and modern on a budget. It's soooo inspiring to me.
Stay cool!
great tutorial! this would be perfect in one of our bathrooms & kitchen! the tricky part is finding good fabric that isn't an arm & a leg!
I am so grateful! I was just about to tackle a real roman shade project that I found on Martha's. I think this will be perfect!
When do we get to see your other bathroom? Please say "very soon." We have had to wait far too long for the unveiling!:)
Pretty please?
You are so crafty! It looks wonderful- It just might work in my playroom!
Hey D! This is very much belated, but I was sending you happy birthday wishes from Decatur in my mind all day long and didn't get to the computer to be able to tell you on your big day. I hope it was a FABULOUS one, though! I just read about your strawberry cupcakes and white icing...it's not very often (ok, it's never) that I share any crafting or baking secrets with you, but I bet Betty Crocker's butter cream icing would be to die for on those!! Have you ever had it? It's all I ever use and it's off white so you can color it with food coloring if you need to. It's our favorite! Now you've got me wanting strawberry cupcakes...I think I'm going to the store right this second! Love from the McClendons!
Good Job. I do not sew so this inspires me.
Found your blog while searching 5dollardinner.com site for dinner ideas. Thank you for your blogs that give us a glimpse of a young family with such a bright future. Getting ready to send my twin 18-year old boys off to college in 2 different states and having a hard time but know God always watches over them and protects them.
Yipped Yippee Yippee! I've been waiting for this! I'm doing this this weekend! Seriously! I have this new house with all these curtainless (and even a few mini blindless) windows and my windows need eyebrows! :-) I'm so laughing at the eyeballing because my hubby is always getting so frustrated with me because i never measure! Thanks girl!
You're so good. I just love seeing all of your sewing projects. I do good to get a button back on (& it ain't pretty).
Made your garden chicken last night for dinner - yum.
These are so nice, thanks for sharing how you made them! And I just love that orange! So fun!
So much fun! This would be what the Nester calls a "mistreatment"- anything with hot glue and the term "eyeball it" counts! :) I love to eyeball things, too and find that I like them best that way. Drives Jason batty.
Of course, it's adorable! Looks great! Thanks for the tutorial and especially the points about black out liner. I learned that one the hard way. Wish I would have known that 10 years ago!
okay...i'm thinking i can handle this.
thanks for the tutorial.
Perfect! I am about to start working on window treatments for our house and this will be perfect in the kids' bathroom.
Thanks so much for sharing your secrets!
Thanks for posting this tutorial! This is exactly what I have been looking for. I can't wait to go fabric shopping!
Yay! I needed this - exactly what I am going to do in my nursery. Like you I am just finishing up Eli's nursery - he is only 9 1/2 months old. haha!
Thanks again!!
Thanks Darby! Great tutorial! I'm so happy you posted this! I'm off to try it for my office!! Fran
My husband just asked why I screamed "YES!!!" It's because I am THRILLED you posted this tutorial. I have admired your roman shade curtains for so long and have even picked out the fabric necessary to copy them...but no idea how to sew them.
Miss Darby, you are the best. I thank you, my kitchen windows thank you and my husband thanks you (because now our kitchen windows will be covered...)
Yeah!!
Love, love, love that fabric!
you make it sound so easy! I just bought my first sewing machine so once I can manage a straight stitch I may give this a try...
Thank you so much for posting this! While part of it is Greek to me, my mama can understand it all, I'm sure! She loves home decor sewing! Please visit my blog and read my latest post, then put us on your prayer list. Thanks!
Thanks for a great looking, easy to make project! I'll have to try this in my sunroom. We made the adjusting kind for my daughter's room and it was no small task. Your's look so much better than our's! I'm sew impressed! :)
Darby - this is awesome! Thanks for sharing. It looks great! I'm might give it a try!
And it looks great! I love your directions, and your blog.
You have done such a wonderful job with the window shade! I only wish I were at all talented with a sewing machine. The fabric you chose is so chic! I absolutely love it. Also, what a wonderful idea to hang it from the crown molding instead of the window trim - it fooled me! It really does make the window look much larger! Great work and thanks for sharing!
Thanks for these instructions. I wish I could find this fabric though, it's fantastic!
This is just one of my favorite tutorials of all-time. Your photographs and instructions are so well put together. I love these shades. Thanks so much.
It was extremely interesting for me to read the blog. Thanks for it. I like such topics and everything that is connected to this matter. I definitely want to read a bit more on that blog soon.
Hello !.
might , perhaps curious to know how one can collect a huge starting capital .
There is no initial capital needed You may begin to receive yields with as small sum of money as 20-100 dollars.
AimTrust is what you thought of all the time
AimTrust incorporates an offshore structure with advanced asset management technologies in production and delivery of pipes for oil and gas.
Its head office is in Panama with structures everywhere: In USA, Canada, Cyprus.
Do you want to become really rich in short time?
That`s your chance That`s what you desire!
I feel good, I started to take up real money with the help of this company,
and I invite you to do the same. If it gets down to choose a proper partner utilizes your savings in a right way - that`s AimTrust!.
I earn US$2,000 per day, and my first investment was 500 dollars only!
It`s easy to start , just click this link http://topumawufe.ibnsites.com/jidesyv.html
and lucky you`re! Let`s take our chance together to feel the smell of real money
Hi !.
You may , perhaps very interested to know how one can make real money .
There is no initial capital needed You may commense to receive yields with as small sum of money as 20-100 dollars.
AimTrust is what you haven`t ever dreamt of such a chance to become rich
The company incorporates an offshore structure with advanced asset management technologies in production and delivery of pipes for oil and gas.
It is based in Panama with offices everywhere: In USA, Canada, Cyprus.
Do you want to become a happy investor?
That`s your chance That`s what you desire!
I`m happy and lucky, I began to take up income with the help of this company,
and I invite you to do the same. If it gets down to choose a proper companion utilizes your funds in a right way - that`s it!.
I take now up to 2G every day, and what I started with was a funny sum of 500 bucks!
It`s easy to get involved , just click this link http://ehawipew.kogaryu.com/jupyru.html
and lucky you`re! Let`s take our chance together to get rid of nastiness of the life
Thanks sooo very much for this tutorial, I can't wait to make some for my kitchen! And other rooms, yay! Thanks also for the reminder that a blog is a blog and not real life, I'm always amazed at what others accomplish and wonder if that's what everyday is like for them.
It is very interesting for me to read that article. Thanx for it. I like such themes and anything that is connected to this matter. I would like to read more on that blog soon.
Your blog keeps getting better and better! Your older articles are not as good as newer ones you have a lot more creativity and originality now keep it up!
[url=http://akreoplastoes.net/][img]http://akreoplastoes.net/img-add/euro2.jpg[/img][/url]
[b]filemaker pro web publishing, [url=http://rastimores.net/]the software store[/url]
[url=http://akreoplastoes.net/][/url] free adobe video editing software where can i buy microsoft software
gold prices software [url=http://rastimores.net/]software stores uk[/url] software store uk
[url=http://rastimores.net/]Collection Retail Price[/url] software for retail shops
[url=http://akreoplastoes.net/]free autocad fonts[/url] igames + windows vista
microsoft pda software [url=http://akreoplastoes.net/]microsoft software downloads[/url][/b]
superrrr
Hi,
Is your blackout lining vinyl? or a cotton/polyester blend?
I am using your tutorial and was curious. Did you hand sew the folds or use a machine? And did you sew in the middle of the fold so that they don't sag? Thought you'd like to know that this is my FIRST sewing machine project. You inspired me :)
you choose a perfect fabric....How easy is that.....I will try it myself.
Roman shades concord, ca
This is perfect! I'm doing faux roman shades mounted from the ceiling and I couldn't figure out for the life of me how to do it, so huge thanks for that last photo!!
Can't wait to get started now!
Thanks for the tutorial. I just made one and it was not as easy as I thought it would be. You MUST make sure that your fabric is SQUARE - you can't just eyeball it. I cut a piece of cardboard a little wider than my shade and 4 inches tall (the length I wanted my folds to be) and used that to make sure that my folds were even all the way down the shade. It also helps to have one side of the shade lined up on the edge of the table so that you are not getting off track. I was pleased with the way it turned out and am now ready to face the task of an operable hobbled roman shade.
Thanks for the tutorial. I just made one and it was not as easy as I thought it would be. You MUST make sure that your fabric is SQUARE - you can't just eyeball it. I cut a piece of cardboard a little wider than my shade and 4 inches tall (the length I wanted my folds to be) and used that to make sure that my folds were even all the way down the shade. It also helps to have one side of the shade lined up on the edge of the table so that you are not getting off track. I was pleased with the way it turned out and am now ready to face the task of an operable hobbled roman shade.
I wanna buy window shades with designs such as this. I like Roman shades. It gives an ancient but elegant look to the house.
Measure, cut, sew. Thanks for the tutorial. It looks easy to do as long as you know how to sew and measure right. I see that orange is how you themed your bathroom. That’s great as the warmth of the bright color would reflect the heat. Roxie @ WindowTreatmentsPhiladelphia.com
This is really nice post works well and easy to configure...thanks for all info.
customized duplex blinds in abu dhabi
Roman Shades are the best for home and offices. If anybody looking for Shades in Miami then also contact A1CM. It is the best and largest company that offer window treatment.
Post a Comment